Add views to a Langium-powered VS Code extension
 Markus Rudolph
Wait! What do you mean?!
VS Code is a famous and extensible editor. With its extensions you can add more functionality. You can write your own extension using Typescript.
One aspect you can add are webviews. Webviews can display anything that a browser is able to, even a local web application. Here is an important distinction you might require: This webview can be part of the side panels which you normally expect on the left and at the bottom. But it is not a custom editor, which can be called for a single document. Webviews are not necessarily associated with a document, but editors are.
In this guide I have chosen a React web application to be the star in the webview. Don’t worry, the other frontend stacks are still realizable.
Langium is a language workbench framework that supports you to write software languages and editors for them. A software language is an entire programming language or something domain-specific (think of mathematical and regular expressions).
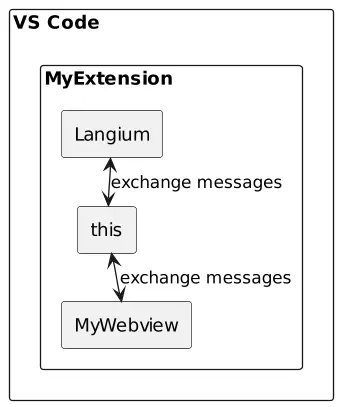
Because webviews are sand-boxed, each one is placed into its own iframe. For exchanging data you can send messages.
Organizing messages can become very confusing. But there is an abstraction used in this guide called the “VS Code Messenger”. It enables you to define different types and shapes of messages and it sends the messages to the right recipients (extension or a certain view).
What you will need
You should start with a working Langium project that includes a VS Code extension.
What you will get
A new webview inside of your extension that is able to communicate with the other parts of your extension - like the Langium language server or the extension itself or even other views.
Some by-products
I will try to keep this guide compact. The consequences are:
- everything will be in one NPM package: For bigger projects it might make sense to separate each view in its own package, sharing another package for all the common stuff. I will give some hints for splitting at the end of this guide.
- I will only embed React. I will not use any styling library (Bootstrap or Tailwind). But the approach is similar to including React.
- I will use VS Code Messenger for communication between the components: This makes the source code more readable by hiding serialization details.
The plan
- Install the correct packages
- Create a React web app
- Embed the app into the extension
- Communicate with each other
- Messaging with the language server
Little helpers
Here are some links that I found also quite helpful, when making the new view:
- Webview API guide
- VS Code Messenger project
- Blog post by Dennis Hübner about VS Code Messenger: check it out, especially when you want to debug the messages
Let’s go!!!
Install the correct packages
Relevant for the extension to know what are webviews.
npm install vscode-webview
npm install --save-dev @types/vscode-webview
Relevant for the VS Code Messenger. We need the messenger for simplified communication between extension and view.
npm install vscode-messenger vscode-messenger-common vscode-messenger-webview
Relevant for React. We need React to create a web app.
npm install react react-dom
npm install --save-dev @types/react @types/react-dom
Relevant for ESBuild. We will need ESBuild to pack our web application.
npm install --save-dev esbuild
Create a React web app
Create an app folder and within this folder three files, namely index.tsx, App.tsx and esbuild.js.
import * as React from "react";
import { createRoot } from "react-dom/client";
import { App } from "./App";

const domNode = document.getElementById('root');
const root = createRoot(domNode!);
root.render(<App/>);
import * as React from "react";

export function App() {
  return <div>Hello world</div>;
}
import esbuild from 'esbuild';

esbuild.buildSync({
    entryPoints: ['src/app/index.tsx'],
    outfile: '../media/app.js',
    bundle: true,
    loader: { '.ts': 'ts', '.ttf': 'copy' },
    platform: 'browser',
    sourcemap: false,
    minify: false,
});

console.log('Build succeeded');
After adding these files, try to bundle the app with node esbuild.js. The resulting ./media/app.js will be referenced by the next step.
Embed the app into the extension
Let’s create a WebviewViewProvider. This provider can be imagined as a place that tells the extension what HTML needs to be rendered. The HTML takes care of importing CSS and JS by pointing to a sub folder of the extension (media).
import * as vscode from "vscode";
import { Messenger } from "vscode-messenger";

export class MyViewProvider implements vscode.WebviewViewProvider {
  public static readonly viewType = "my-app-view";

  public static register(messenger: Messenger, context: vscode.ExtensionContext) {
    const viewProvider = new MyViewProvider(messenger, context.extensionUri);
    context.subscriptions.push(vscode.window.registerWebviewViewProvider(this.viewType, viewProvider));
  }

  constructor(
    protected readonly messenger: Messenger,
    protected extensionUri: vscode.Uri
  ) {}

  public resolveWebviewView(
    view: vscode.WebviewView,
    _context: vscode.WebviewViewResolveContext,
    _token: vscode.CancellationToken
  ) {
    view.webview.options = this.getWebviewOptions();
    view.webview.html = this.getHtmlForWebview(view.webview);
    this.messenger.registerWebviewView(view);
  }

  protected getHtmlForWebview(webview: vscode.Webview) {
    const pathOnDisk = vscode.Uri.joinPath(this.extensionUri, "media", "app.js");
    const scriptUri = webview.asWebviewUri(pathOnDisk);
    return `<!DOCTYPE html>
			<html lang="en">
			<head>
				<meta charset="UTF-8">
				<meta name="viewport" content="width=device-width, initial-scale=1.0">
				<title>My view</title>
			</head>
			<body>
        <div id="root"></div>
				<script src="${scriptUri}"></script>
			</body>
			</html>`;
  }

  protected getWebviewOptions(): vscode.WebviewOptions {
    return {
      enableScripts: true,
      // Restrict the webview to only loading content from our extension's `media` directory.
      localResourceRoots: [vscode.Uri.joinPath(this.extensionUri, "media")],
    };
  }
}
To make this change visible to the extension, you will have to add some entries in the package.json.
{
  //...
	"contributes": {
    "views": {
       "my-container": [
         {
           "type": "webview",
           "id": "my-app-view",
           "name": "My view"
         }
       ]
     },
     "viewsContainers": {
       "panel": [
         {
           "id": "my-container",
           "title": "My Extension",
           "icon": ""
         }
      ]
    }
  }
}
Within the app.tsx, you can initialize the messenger as well. Just put the following code on module scope:
import { Messenger } from "vscode-messenger-webview";

const vscode = acquireVsCodeApi();
const messenger = new Messenger(vscode, { debugLog: true });
messenger.start();
Communicate with each other
Let’s send some messages. First we need to define what messages will be sent. You can decide between a notification (one-way-message) or a request (two ways: one question, one answer comes back).
import { NotificationType, RequestType } from "vscode-messenger-common";

export const PingNotification: NotificationType<number> = { method: 'ping' }
export const PongNotification: NotificationType<number> = { method: 'pong' }

export const PingPongRequest: RequestType<number, number> = { method: 'ping-pong' }
It is also a good idea to have an address book with all recipients.
import { MessageParticipant } from "vscode-messenger-common";

export const AddressBook = {
	extension: { type: 'extension' },
  myView: { type: 'view', webviewType: "my-app-view" },
} satisfies Record<string, MessageParticipant>;
Note, that we have a duplicated value here ("my-app-view", here and in the provider). It might make sense to add constants for each view name here and use them from the single providers. If you do so in the opposite direction, you might end up into dependency issues.
The communication code for both sides looks the same. No side needs to do some special execution.
For sending notifications, do:
messenger.sendNotification(PingNotification, AddressBook.extension, Math.random());
For receiving notifications:
messenger.onNotification(PingNotification, num => { /* do something with num */ });
For sending requests:
const result = await messenger.sendRequest(PingPongRequest, AddressBook.myView, Math.random());
For receiving requests:
messenger.onRequest(PingPongRequest, num => {
    return num * 2; //will be the result of the caller
});
Please be aware of the fact, that these on__ methods for registering handlers return a disposable to unregister the handlers again.
Keep that in mind if your want to cleanup your extension - when deactivating it for example.
Messaging with the language server
The language server of your Langium language will be started by the extension in an extra web worker. If you want to talk with your view from the language server, you need to use the extension as a proxy.
For your language server, you can use these helper methods. They support you in using the notification and request types, that you have already defined.
const connection = /* from the creation of the services object */;

function sendNotification<T>(notificationType: NotificationType<T>, params: T): void {
  connection.sendNotification(notificationType.method, params);
}
function onNotification<I>(requestType: NotificationType<I>, callback: (input: I) => void) {
  connection.onNotification(requestType.method, callback);
}
function sendRequest<I, O>(requestType: RequestType<I, O>, params: I): Promise<O> {
  return connection.sendRequest(requestType.method, params);
}
function onRequest<I, O>(requestType: RequestType<I, O>, handler: (input: I) => Promise<O>): void {
  connection.onRequest(requestType.method, handler);
}
Example usage within the language server:
export const ParsedNotification: NotificationType<string[]> = { method: 'parsed' }

//when documents are parsed, send their URIs to the extension
services.shared.workspace.DocumentBuilder.onBuildPhase(DocumentState.Parsed, async (built) => {
  sendNotification(ParsedNotification, built.map(doc => doc.uri.toString()));
});
If you want to forward your notifications and request between the language client (which initiates a connection to the language server) and the messenger, I can give you the following helper methods:
const client: LanguageClient = /* the one within the extension */
const messenger: Messenger = /* the one that we have created earlier this post */;

function forwardNotificationFromLanguageServer<I>(notification: NotificationType<I>, participant: MessageParticipant) {
  client.onNotification(notification.method, (p: I) => messenger.sendNotification(notification, participant, p));
}
function forwardNotificationToLanguageServer<I>(notification: NotificationType<I>) {
  messenger.onNotification(notification, (p: I, _sender: MessageParticipant) => client.sendNotification(notification.method, p));
}
function forwardRequestFromLanguageServer<I, O>(request: RequestType<I, O>, participant: MessageParticipant) {
  client.onRequest(request.method, (p: I) => messenger.sendRequest(request, participant, p));
}
function forwardRequestToLanguageServer<I, O>(request: RequestType<I, O>) {
  messenger.onRequest(request, (p: I, _sender: MessageParticipant) => client.sendRequest(request.method, p));
}
Keep in mind again that on__ method’s return value is disposable for releasing those listeners again.
Let’s assume we will receive a ping notification from the language server and want to forward it to our new view, you need to add the following in your extension:
forwardNotificationFromLanguageServer(PingNotification, AddressBook.myView);
The proposed function add listeners that just forward the message to the specified participants. Since they are registering listeners, you only have to call them once during the extension activation.
Hint: Split into more packages
In real-world projects you might want to separate each component into its own package.
I recommend to make one package for each…
- extension
- language
- webview + webapp
- you can even split these two, if you want to opt-in for a separate IDE or web-browser application
Furthermore, I like it to split out one commonor shared package for the message types, because they are needed in all parts you want to communicate with.
Final words
I hope these tools will help you to create some amazing views. If you have any trouble following this guide, do not hesitate to reach out to me.
About the Author
Markus Rudolph
Markus likes to be creative: writing programs, drawing or scripting song texts. He normally has more ideas than time to implement them. But his secret passion is the subject of language engineering.