The Langium Playground
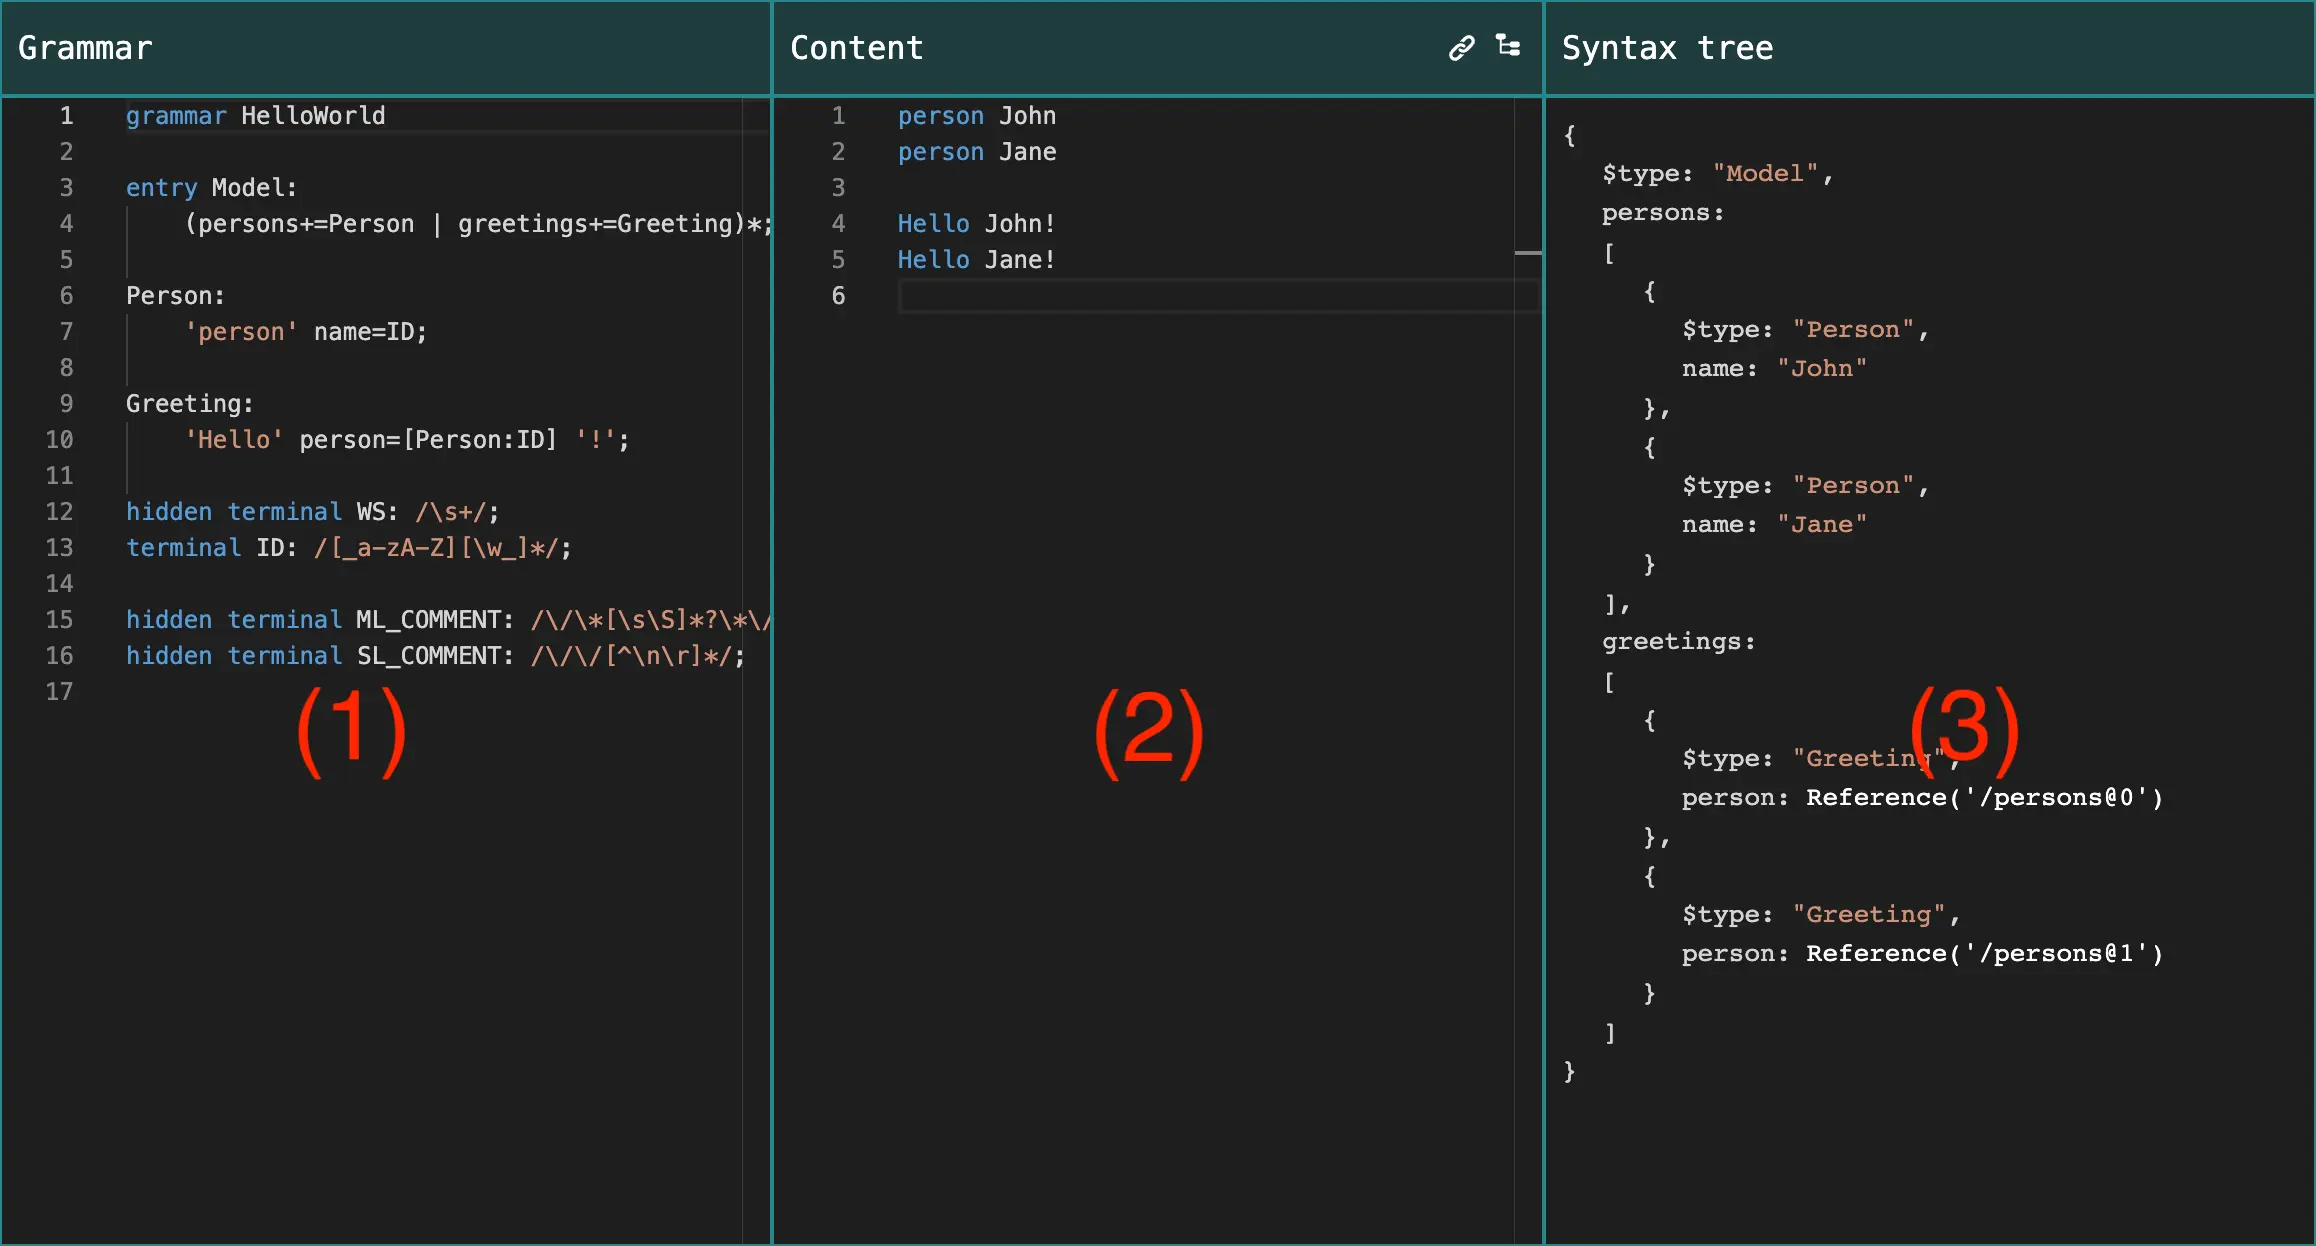
Langium has its own playground, where you can now test the conversion of text into a well-defined model. It runs without support from the backend.
Pardon? Langium?!
Langium is a tool to create languages (and feature-rich editors). And languages are raw texts that are both human-readable and machine-readable. Think of XML, C source code or CSS.
But to transform a text into an explicit structure, there is some work that needs to be done. A text transformation in Langium is described by a grammar.
Let’s take the following text as an example (playground link):
grammar HelloWorld

entry Model:
    (persons+=Person | greetings+=Greeting)*;

Person:
    'person' name=ID;

Greeting:
    'Hello' person=[Person:ID] '!';

hidden terminal WS: /\s+/;
terminal ID: /[_a-zA-Z][\w_]*/;
A grammar – in the context of compiler construction – is a set of rules that spreads out all possible input texts that you want to recognize.
The shape of a rule can be compared with a function definition in your favorite imperative programming language: the left part preceding the colon is the signature of the function, the right part is its body.
The rule body consists of calls to other rules (by rule name) or terminals which represent actual text that gets recognized. Let’s have a look at the rule Person.
Person: 'person' name=ID;
Here: Person is the name of a rule, 'person' is a text and name=ID is the call of the terminal rule ID whose parsed text is assigned to a property name.
Let’s say we have the input person Markus. The result of applying Langium is a model that contains a Person object with the name Markus.
What does the Playground do?
The Langium playground can help you to sketch a text-to-model transformation (parsing). And you can prototype and test Langium immediately without installing anything.
All you need to know is the purpose of each panel inside of the playground.

- The first panel is the grammar editor: Here we develop the shape of the language. The term shape is also meant as a resulting JavaScript object model that you can use after the parsing is done.
- The second panel contains one instance of your language. One instance of the given grammar could be a list of person declarations, like
person Markus. - The third panel is initially hidden and can be made visible using the tree button above the content panel. Here you will get the syntax tree of your content in the shape of your grammar.
Every change in the grammar triggers a rebuild of the parsing toolchain. And every content change triggers a new parsing attempt of the content, which populates the syntax tree in the third panel.
So, just drop some lines into the content panel. Just take one instance of your new language. Then, you can start your grammar and improve it until all errors are gone. Fantastic, isn’t it?!
You are now able to test and share your ideas. The playground will help you to understand single abstract syntax trees.
Knowing the syntax tree is the key to master validators, generators and even interpreters.
Let’s create a JSON parser!
Here is the plan for creating a JSON parser:
- we add the primitive values for
boolean,trueandfalse. - we add the complex value of
listto hold booleans. - we add the
objectvalue. - we add the remaining values (
number,null,undefined).
Let’s do it!
1. Add boolean values (solution)
Simple character data like false or true can be described as terminals. So, just write:
terminal BOOLEAN: /true|false/;
Every grammar has an entry parser rule, to signal where the language starts from. Please add:
entry Value: BooleanValue;
BooleanValue: value=BOOLEAN;
The assignment value=BOOLEAN takes the content of the boolean value and assigns it to a property value in a surrounding model typed as BooleanValue.
If you want to ignore whitespace add this line as well. The hidden keyword filters out all whitespace from the stream of terminals during the parsing process, so you do not have to care about it.
hidden terminal WS: /\s+/;
If you fill in true to the content panel, you will get a nice syntax tree with your value true in it.
2. Add list values (solution)
Out goal now is to add list values. List contain arbitrary values (like lists and booleans for now). So, we add a definition for the list, first:
List:
    '[' (elements+=Value (',' elements+=Value)*)? ']';
Mind the elements+=Value assignments. The += creates a list of values for you.
Afterwards, you only need to reference it in the Value rule by adding an alternative with the or operator |:
entry Value: BooleanValue | List;
Now, test it with a list of booleans like [true, false].
Amazing!
3. Add object values (solution)
For an object we need a string value to model the name of each entry. At the same time we can introduce a new Value rule alternative.
StringValue: value=STRING;
terminal STRING: /"[^"]*"/;
Now you can add a series of name-value pairs:
NameValuePair: name=STRING ':' value=Value;
And finally, add the Obj rule:
entry Value: BooleanValue | List | StringValue | Obj;
Obj:
    '{' (nameValuePairs+=NameValuePair (',' nameValuePairs+=NameValuePair)*)? '}';
Test it!
{
  "boolean": false,
  "string": "abc",
  "LIST": ["", false],
  "object": {"hello": "world"}
}
Great! Beautiful :).
4. Practice: Add the remaining values
-
for
number -
for
null -
hint: you can set the type of terminals by adding a returns statement:
terminal NUMBER returns number: ...
Here is the solution.
Happy coding!
About the Author
Markus Rudolph
Markus likes to be creative: writing programs, drawing or scripting song texts. He normally has more ideas than time to implement them. But his secret passion is the subject of language engineering: He is founder of an initiative called »Language Benders« for people who want to learn more about creating languages.


