Language execution with Langium and LLVM
 Markus Rudolph
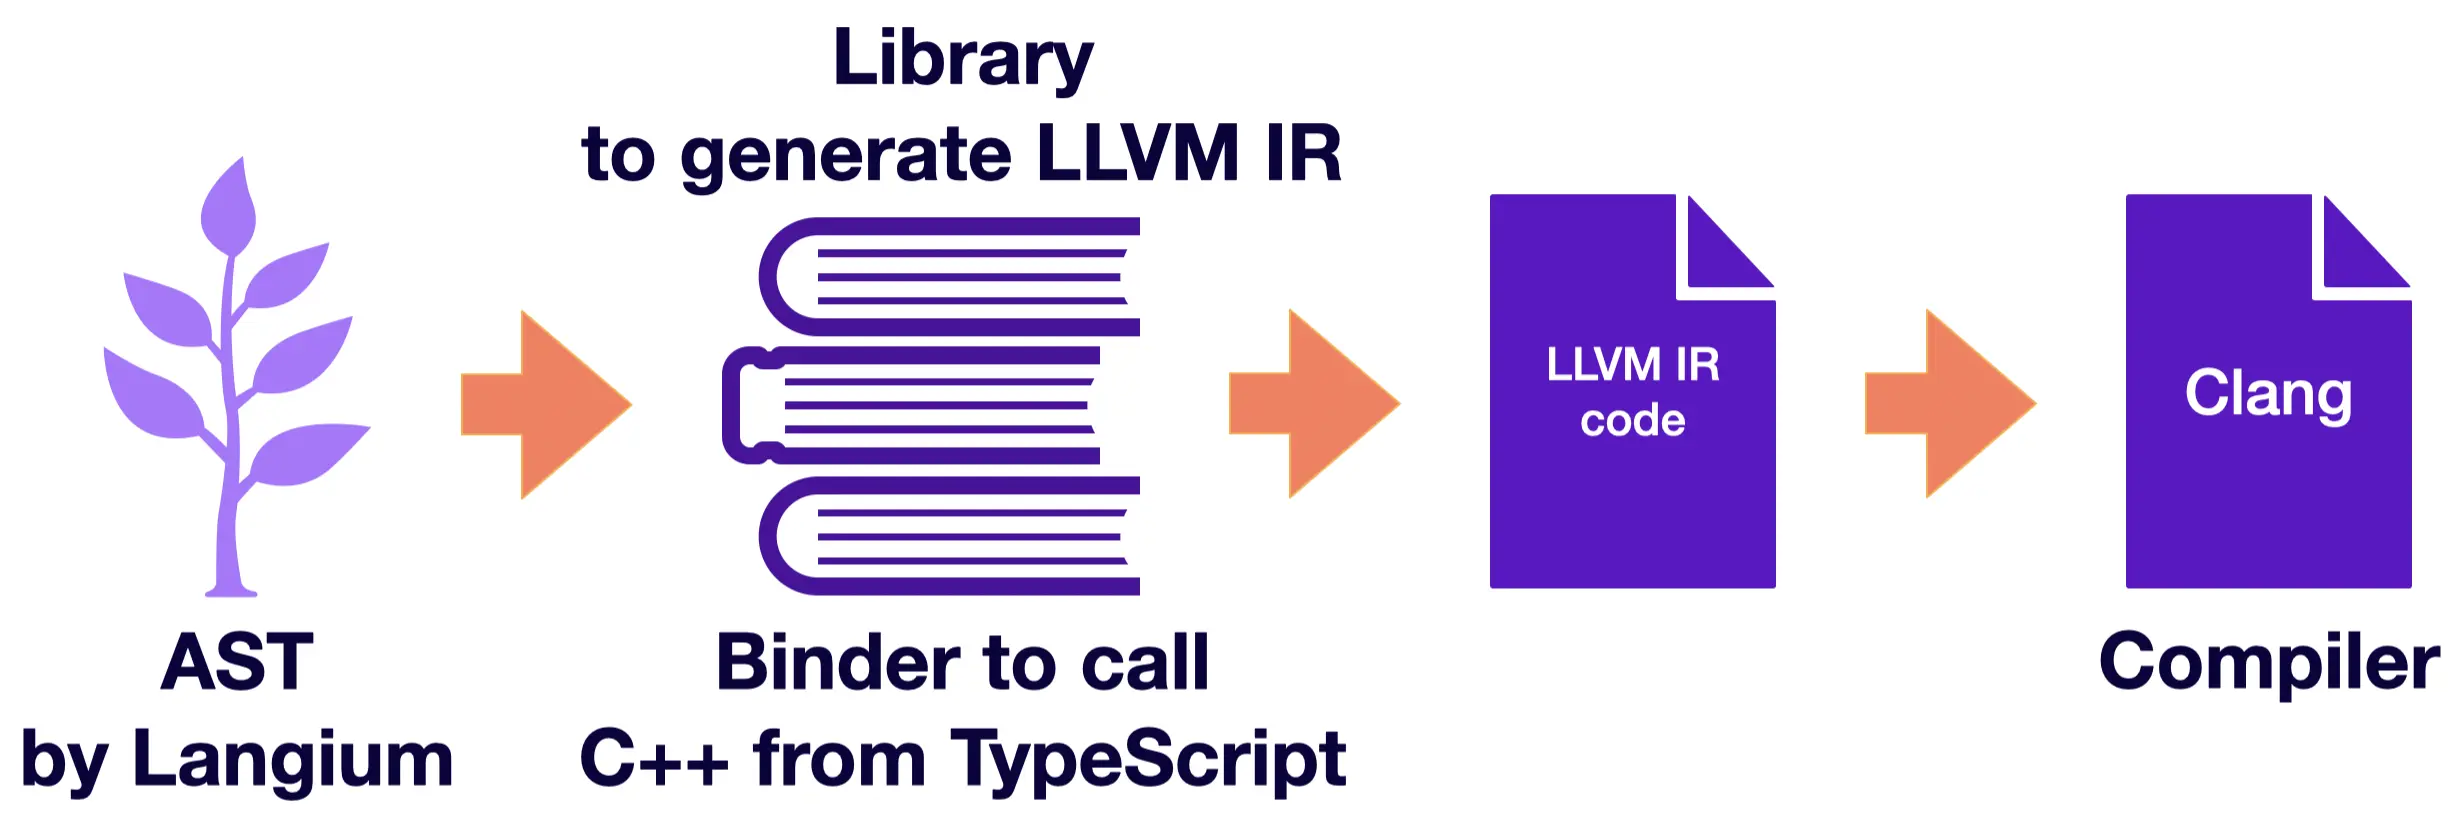
In a previous blog post, we combined Langium with LLVM in order to execute the toy language Ox. Langium realizes the language frontend of Ox including lexing, parsing, linking and validating the source language with an AST as result. We are using LLVM to create the language backend of Ox, that is generating code for a target platform or target language like LLVM IR code.
In this blog post, we take again the Ox language and show you - step by step - for each part of the Ox’ abstract syntax tree (AST) how to generate LLVM IR code. While part one also considered an interpreter solution as language backend, here we do only show a generator solution with LLVM. The outcome of this adventure are programs, that can run optimized and natively on your machine, plus they are debuggable using the toolchain of LLVM.
The Ox language
… is a basic imperative language with C-like syntax. It has
- arithmetic and logic expressions, like
1 + 2 * 3anda or b and c, - variable declarations, like
var x: number, - variable assignments, like
x = 5 - several control flow statements given below:
- if-else block statements, like
if(condition) { ... } else { ... } - while block statements, like
while(condition) { ... } - for block statements, like
for(var i=0; i<length; i = i+1) { ... }
- if-else block statements, like
- function declarations, like
fun factorial(n: number): number { ... return r; } - function calls, like
factorial(5) - it also has a built-in
printfunction, likeprint 5
You can find the Langium grammar of Ox here. Ox is a reduced version of Lox, whose Langium grammar can be found here.
Example Ox program
Here is an example of a factorial program in Ox:
fun factorial(n: number): number {
    var res: number = 1;
    for (var i: number = 2; i <= n; i = i + 1) {
        print res;
        res = res * i;
    }
    return res;
}

print factorial(5);
The plan
To make this Ox program executable, we…
- take its abstract syntax tree (AST) after Langium has parsed, linked and validated it.
- then we traverse the AST and generate so-called LLVM IR code with the help of the LLVM API.
- finally, we compile the generated LLVM IR code with
clangto get an executable - or even debuggable - file
Be aware that this tutorial is using native bindings which bind Typescript to LLVM API version 14. At the time of writing this article, the latest LLVM version is 19.
What is LLVM IR?
LLVM IR is a low-level programming language, similar to assembly, designed to be used by the LLVM compiler framework. LLVM IR stands for Low-Level Virtual Machine Intermediate Representation.
You really can think about it as assembly with infinite number of registers! The difference from assembly languages, like x86 or ARM, is that LLVM IR is a platform-independent representation. So, you can generate machine code and execute your LLVM IR program on all platforms supported by LLVM (see more details in the backend section of the Wikipedia article).
Another difference is that LLVM IR is providing statements in the SSA form (static single-assignment), which means that each variable (or register) in an LLVM IR program can be assigned only once. The SSA form is very convenient for making optimizations.
But generating LLVM IR by hand can be extremely tedious. The LLVM IR (assembly-like) language has its own syntax and semantics. You can - of course - write LLVM IR code by hand using your favorite write/appendFile method, but it’s not recommended. Instead, the LLVM API can help you to generate LLVM IR code in a more convenient way.
Example: Hello World in LLVM IR
Here is an example LLVM IR code for a hello world program:
target triple = "i386-pc-linux-gnu"

@.str = private constant [15 x i8] c"hello, world!\0A\00"

define i32 @main() {
entry:
  %str = getelementptr inbounds [15 x i8]* @.str, i32 0, i32 0
  %call = call i32 (i8*, ...)* @printf(i8* %str)
  ret i32 1
}

declare i32 @printf(i8*, ...)
Having this code snippet, you can compile it with clang and get an object file.
The printf function is a part of the C standard library, so you can call it in your LLVM IR code.
But to make the code executable, you must link your object file with the C standard library.
LLVM API using llvm-bindings
The motivation of using the LLVM API is to generate LLVM IR code in a more convenient way. The API does not talk in untyped text, but in typed entities, like control flow blocks and variables, making it easier to put matching pieces together. We are using Typescript, so we need to use this bindings library to call the LLVM API from Typescript. Please be aware of the fact that this binding package is currently not maintained (Additionally, for Mac, the binaries are also outdated).
The key components of the used bindings library are listed below. They reflect the LLVM API at version 14:
Modulescan be seen as translated units containingfunctionsandglobal variables. It relates to the compiled object file mentioned above. For the sake of simplicity our ‘Ox language’ will only have one module per.oxfile with amainfunction entry point. Linking multiple files is out of scope of this article.Functionsare the next biggest bricks in the LLVM building. They contain the actual code as a graph ofbasic blocks.Basic blocksare containers for instructions. These blocks are linked together by jump and branch instructions. Every block ends with a return or a jump instruction.variablesare acquired pieces of memory. Global variables are stored on the same level as functions and local variables are stored in the function’s stack frame.IR instructionsare machine operations for LLVM. They are similar to assembly instructions.DI instructionsare instructions to place some debugger information beside the IR instructions.
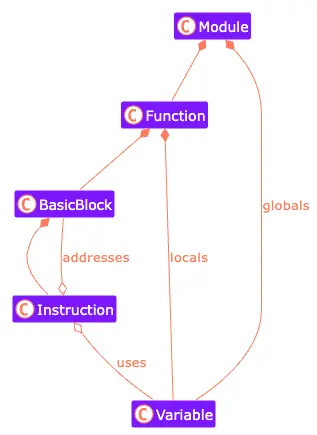
All these concepts are being holded or assembled together by:
- the
LLVM contextis a container for LLVM’s global data structures. It is used to manage memory and other resources. - the
IR builderis the heart of building the actual LLVM IR code. It provides an easy-to-use interface for generating LLVM functions, blocks and instructions. - the
DI builderon the other hand is used to generate debug information for the instruction emitted by the IR builder. Thanks to this, you will be able to debug your LLVM IR code, but you will actually step through your Ox file. The mapping for LLVM IR to Ox code is done by annotating parts of your IR with debug information (DI).
Where to start?
The following lines are referring to the given repository TypeFox/langium-llvm at a certain commit in the Git history in order to make sure that you are able to understand the code and the links between certain files. You can also use the main branch, but be aware that the code might have changed after this blog post. Be aware that I will refer to this certain commit as “Original Code”.
Furthermore, we will focus on the src/cli/llvm-ir-generator folder in the repository. Everything else should be seen as already given (like the Langium language Ox and its AST classes).
Here is an outline of what we will do next:
- (1) we will make a minimal LLVM program and create some basic structures to manage all necessary resources
- (2) we will create a
printmethod to get actual feedback during the execution of our program - After that we will traverse the AST and implement the following constructs:
- Last step execute the generated LLVM IR code
Let’s start!
(1/10) Minimal LLVM program
Setting up the data structures
We will manage all resources in two different Typescript types. The first is called IR and the second is called DI. They manage everything relevant to build LLVM code on a intermediate representation (IR) level and debug information (DI) level. You can find them here.
Let’s explain them in more detail.
export type IR = {
    context: llvm.LLVMContext,
    module: llvm.Module,
    builder: llvm.IRBuilder,
    basicTypes: Map<string, llvm.Type>,
    nameToAlloca: Map<string, llvm.AllocaInst>,
    globalValues: Map<string, llvm.Constant>,
}
The pieces here are:
- the LLVM
context, which is needed to create other parts of LLVM (it is like a container of resources). - the
module, which stands for our single LLVM code file - the IR
builder, which is used to create functions, blocks and instructions within our module. More details about the C++ API can be found here. - the
basicTypes, which is a map of the LLVM IR types being used, accessed via Ox type name - the
nameToAlloca, which is a map of the variables and their correspondingallocaobjects.allocaobjects are the LLVM representation of an allocated piece of memory. - the
globalValues, which is a map of the global variables and their corresponding values
export type DI = {
    builder: llvm.DIBuilder,
    file: llvm.DIFile,
    scope: llvm.DIScope[],
    basicTypes: Map<string, llvm.DIBasicType>,
    unit: llvm.DICompileUnit,
}
Explanation of the pieces:
- the DI
builder, which is used to create debug information for the IR instructions. More details about the C++ API can be found here. Like the IR builder, the DI builder generates LLVM code to annotate IR codes with debug information. - the
file, which is the file from where the IR code was generated from (an Ox file). You need it as parameter to annotate IR code with the(file, line)information. - the
scope, which is a stack of scopes to keep track of function definitions and their local definitions. - the
basicTypes, which is a map of debug information for the particular basic types. We will use it as type computation cache. - the
unit, which stores all information about the compile unit (output file). (This field was made for future purposes in mind, currently we do not use it.)
The initialization of the IR and DI types can be found here. It is actually just a list of constructor calls straight through the LLVM API.
Setting up the main method
The main method is the entry point of our program. It is the first function that will be called when the program starts. In our Ox repository we spent an entire file for the main method. You can find it here in the original code.
The actual main method will be generated in the generateMainFunc function. The following snippet shows the code to generate the main function. Don’t worry about the snippet length, we are handling IR generation and DI generation at the same time.
function generateMainFunc(ir: IR, di: DI, program: OxProgram) {
    //create a IR signature for the main function
    const mainFuncReturnType = ir.builder.getInt32Ty();
    const mainFuncType = llvm.FunctionType.get(mainFuncReturnType, false);
    const mainFunc = llvm.Function.Create(mainFuncType, llvm.Function.LinkageTypes.ExternalLinkage, 'main', ir.module);

    //create a DI signature for the main function
    const debugInfoParamTypes = di.builder.getOrCreateTypeArray([di.basicTypes.get('int')!]);
    const debugInfoSubroutineType = di.builder.createSubroutineType(debugInfoParamTypes);
    const debugInfoMainFuncSubprogram = di.builder.createFunction(
        di.file, 'main', '', di.file, 1,
        debugInfoSubroutineType, 1, llvm.DINode.DIFlags.FlagPrototyped, llvm.DISubprogram.DISPFlags.SPFlagDefinition
    );
    mainFunc.setSubprogram(debugInfoMainFuncSubprogram);
    ir.builder.SetCurrentDebugLocation(new llvm.DebugLoc());

    //define the main function as topmost scope in our scope stack
    di.scope.push(debugInfoMainFuncSubprogram);

    //set the entry point to the function
    const entryBB = llvm.BasicBlock.Create(ir.context, 'entry', mainFunc);
    ir.builder.SetInsertPoint(entryBB);

    //recursively generate the Ox program as content of the main function
    generateBlock(ir, di,
        program.elements.filter(e => !isFunctionDeclaration(e)), { func: mainFunc, inputVars: [] }
    );

    // generates an artificial `return 0` statement;
    // it's not represented in the source code, and debugging points on a non-existing line
    const endLine = program.$cstNode?.range.end.line! + 1;
    ir.builder.SetCurrentDebugLocation(llvm.DILocation.get(ir.context, endLine, 1, debugInfoMainFuncSubprogram));
    ir.builder.CreateRet(ir.builder.getInt32(0));

    //pop our function scope from the scope stack
    di.scope.pop();

    //finalize and sanity check, is the built code correct LLVM IR?
    di.builder.finalizeSubprogram(debugInfoMainFuncSubprogram);
    if (llvm.verifyFunction(mainFunc)) {
        console.error(`Verifying the 'main' function failed`);
    }
}
Please notice the following key points:
- we need to create a LLVM function, which normally requires creating return and parameter types. Since our
mainwill not have any input parameters, we can usellvm.FunctionType.get(mainFuncReturnType, false)to create the function type that returns a 32-bit integer - the next thing we create is a basic block for the function. This is the place where the actual code will be generated in
- with
ir.builder.SetInsertPoint(basicBlock);we are setting the entry point from the function to the basic block - with
ir.builder.CreateRet(ir.builder.getInt32(0));we instruct the builder to create a LLVM equivalent forreturn 0; - the last thing (
llvm.verifyFunction(mainFunc)) is a sanity check of the entire function. If the function is not correct, we will get an error message
These instructions can be expanded with debug information, so that you can debug your Ox code. The main method generation is only keeping track of the correct DI scope (pushing and popping the main method) and it finalizes the main method. For annotating code with more debug information, you will have to visit other parts of the generator.
Print out the LLVM program
The last step is getting the LLVM source file out of the builder. This is basically done by calling the print method of the module object. The net of LLVM objects, that we have created with our builders, will be transformed into one single string - one LLVM IR file.
The following code snippet shows how to do this. A little extra: we can also check if the module is correct by calling the verifyModule method.
if (llvm.verifyModule(ir.module)) {
    console.error(`${filename}: verifying the module failed`);
    process.exit(1);
}

console.log(ir.module.print()); // this will print the LLVM IR code to the console
(2/10) Print method
print is a special function in Ox: it invokes the write system call to send the data to the output stream. To implement the print function we will rely on the fact that we compile LLVM IR with clang and will be able to call functions from C++ standard library after linking. So, every time when we meet print in the Ox code we will call printf from C++.
The final implementation of the print method can be found here (declaration) and here (call).
Declaration of print
The problem here is that the module verification happens before linking - when LLVM doesn’t know about C++ libraries. To handle the problem, we will declare (but not define!) the printf function. So, we only put its signature in the LLVM module and when it meets the printf call it will know that the function is given.
const bytePtrTy: llvm.PointerType[] = [ir.builder.getInt8PtrTy()];
ir.module.getOrInsertFunction('printf', llvm.FunctionType.get(
    /* return type */ ir.builder.getInt32Ty(),
    /* format arg */  bytePtrTy,
    /* vararg */      true
));
Imagine to call printf("%i\n", 1337) from the system library in C:
- the format
"%i\n"%iis the integer modifier, which tells to assume and integer as first input value,- followed by a newline
\ncharacter
- and
1337is the input value to print, which will be fed into the place of%i
Calling print
Now we want to call the printf. For that we need to ask the LLVM module API about this existing function. After that we will get an function object corresponding to the printf. We can call it with our set of parameters.
const modifier = ir.builder.CreateGlobalStringPtr('%i\n', 'integer_modifier', 0, ir.module);
const printfFn = ir.module.getFunction('printf')!;
const value =  ir.builder.getInt32(1337); //later: generateExpression(ir, di, elem.value);
ir.builder.CreateCall(printfFn, [modifier, value]);
The last line will finally create an instruction in your current basic block.
The format (called modifier) above ('%i\n') is a value that never changes, so we keep it in our global values map as a constant.
(3/10) Literals
It is important to mention that the generation of LLVM IR code traverses along th Ox language AST. This especially gets visible for expressions. An expression can be:
- a binary expression
- an unary expression
- a parenthesis expression
- a boolean or numerical literal
- a member call (variables and function calls)
So, a generation along the grammar means we “switch-case” on the sub types of an expression AST node.
Let’s move on
The translation of literals is pretty simple. The original code can be found here.
export function generateExpression(ir: IR, di: DI, expr: Expression): llvm.Value {
    //add debug information to the expression
    ir.builder.SetCurrentDebugLocation(getDILocation(ir, di, expr));

    if (isNumberExpression(expr)) {
        //translate the number to a LLVM constant
        return llvm.ConstantFP.get(ir.builder.getDoubleTy(), expr.value);
    } else if (isBooleanExpression(expr)) {
        //translate the boolean to a LLVM constant
        return ir.builder.getInt1(expr.value);
    } //... more to follow
}
Since we only have booleans and doubles the solution is quite short.
Notice the insertion of the debug information. This is necessary to map the LLVM IR code to the Ox code. The getDILocation function is a helper to extract positional information (line and column of the passed node) from the given AST node and can be found here.
(4/10) Variables
To declare a variable, we need to allocate memory. For that we will use the LLVM instruction alloca. It allocates memory on the stack. The memory allocated by alloca is automatically freed when the function returns, making it similar to stack allocation in C with local variables. This instruction is often used for temporary storage or for local variables within a function.
We will use the alloca object to store a value in this memory and load a value from this memory. To reach the alloca object we will keep correspondence of a variable name from Ox to the alloca object, so every time when we need the variable content (or we will want update the content), we get the alloca object and read from or write to it.
Global variables are implemented as local variables of the entry main method. They stack on the stack until the main method returns.
Variables are used in three fashions: declaration, read and write.
Variable declaration
The original code can be found here. Please be aware that I kept the debug information code.
All instruction-related code contains the ir variable, all debug code uses the di variable.
export function generateVariableDeclaration(ir: IR, di: DI, varDecl: VariableDeclaration) {
    //destructure the AST node
    const { name, type, value: expr } = varDecl;
    //get the LLVM type from our house keeping
    const irType = ir.basicTypes.get(type.primitive)!;
    const { line } = getPos(varDecl);
    //get the location of the variable declaration
    const diLoc = getDILocation(ir, di, varDecl);

    //create the alloca object using the LLVM mapped type of the variable
    const alloca = ir.builder.CreateAlloca(irType, null, name);
    //describe a auto variable as debug information
    const diLocalVar = di.builder.createAutoVariable(getCurrScope(di), name, di.file, line, di.basicTypes.get(type.primitive)!);
    //insert the declaration using the builder
    di.builder.insertDeclare(
        alloca, diLocalVar, di.builder.createExpression(),
        diLoc, ir.builder.GetInsertBlock()!
    );

    //mark the declaration with positional information
    ir.builder.SetCurrentDebugLocation(diLoc);

    //do a write action on the alloca object in order to store an initial value
    const value = expr ? generateExpression(ir, di, expr) : llvm.Constant.getNullValue(irType);
    ir.builder.CreateStore(value, alloca);

    //keep the alloca object in our house keeping
    ir.nameToAlloca.set(name, alloca);
}
Variable write
In the last lines of the previous section, you already got an impression how to write a value to a variable or an alloca object.
Here, we will translate an assignment of some value to a variable. The original code can be found here.
export function generateAssignment(ir: IR, di: DI, assign: AssignmentStatement) {
    //destructure the AST node
    const { varRef, value: expr } = assign;

    //get the alloca object from our house keeping
    const name = varRef.ref?.name!;
    const alloca = ir.nameToAlloca.get(name);
    if (!alloca) {
        throw new Error(`LLVM IR generation: assignment to not existing variable '${name}'.`);
    }

    //attach a debug information to the assignment
    ir.builder.SetCurrentDebugLocation(getDILocation(ir, di, assign));

    //generate the value to write
    const value = generateExpression(ir, di, expr)
    //store the value in the alloca object
    ir.builder.CreateStore(value, alloca);
}
Variable read
The actual trick for reading a variable is to use the CreateLoad instruction in combination with the right alloca reference.
The original code can be found here.
export function generateExpression(ir: IR, di: DI, expr: Expression): llvm.Value {
    //...already written code
    //else if (isBooleanExpression(expr)) {
    //    return ir.builder.getInt1(expr.value);
    //} else
    if (isMemberCall(expr)) {
        return generateMemberCall(ir, di, expr);
    } //else ... more will follow...
}

export function generateMemberCall(ir: IR, di: DI, expr: MemberCall): llvm.Value {
    //ATTENTION! This function is called MemberCall. MemberCalls are chained calls like a.b.c.d ...
    //Here in Ox we have no chaining, just simple variable references.

    //destructure the AST node
    const member = expr.element.ref!;

    //attach a debug information to the member call
    ir.builder.SetCurrentDebugLocation(getDILocation(ir, di, expr));

    //tricky: the member can be a variable or a parameter
    if (isParameter(member) || isVariableDeclaration(member)) {
        const varName = member.name;

        //get the alloca object from our global house keeping
        const globalValue = ir.globalValues.get(varName);
        if (globalValue) {
            return ir.builder.CreateLoad(globalValue.getType().getPointerElementType(), globalValue);
        }

        //get the alloca object from our local house keeping
        const alloca = ir.nameToAlloca.get(varName)!;
        if (alloca) {
            return ir.builder.CreateLoad(alloca.getAllocatedType(), alloca);
        }

        //throw an error if not found (should not happen when you compile an Ox code with zero errors, right?)
        throw new Error(`LLVM IR generation: Variable '${varName}' is not in scope.`);
    } else //... more to follow
}
(5/10) Unary and Binary operations
The most important thing to understand about operations in LLVM IR - they are not polymorphic.
In C++, for example, you can add 2 numbers with one operator + and these numbers can be integral or float, signed or unsigned.
C++ understands (with casting rules) which + implementation to call, which depends on the operands.
This is not the case for LLVM IR: Here you must fulfil two things:
- Find out which operator needs to be called.
- Make sure that the input argument types are the same as the operator parameter type or can at least be converted to them without loss of information.
In Ox we currently have no overloaded operators. Each Ox operator is directly assigned to a certain LLVM IR operator. Each LLVM IR operator gets passed alloca objects as arguments. You are dealing only with memory, so to speak. The interpretation as a certain shape or type is only done by the LLVM IR operator.
As example, there are three different add methods in LLVM IR for different data interpreted as:
- integral signed
- integral unsigned
- or floating point
So, your variable is just a piece of memory that contains bits and only the operator knows how to interpret it.
For our Ox language we have only 2 types: number and boolean. The number is a floating point and the boolean is a 1-bit integer.
function generateBinaryExpr(ir: IR, di: DI, expr: BinaryExpression): llvm.Value {
    //first we generate the left and right operands
    const left = generateExpression(ir, di, expr.left);
    const right = generateExpression(ir, di, expr.right);
    const op = expr.operator;

    if (op === '+') {
        return ir.builder.CreateFAdd(left, right);
    } else //similar approach can be applied for -, /, *, <, >, ...

    if (op === 'and') {
        return ir.builder.CreateAnd(left, right);
    } else { //similar approach can be applied for `or`
        throw new Error(`LLVM IR generation: No operator '${op}'.`);
    }
}
Be aware of the possible recursion here. Expressions like 1+2+3 will cause a recursion 1+2 before adding 3.
Unary operations are similar to binary operations. The only difference is that they have only one operand.
The original code can be found in the expr.ts.
Side note: If you would like to implement operator overloading, you would need to find out which argument types are given and then select the operator implementation whose parameter types matches the input argument types. Sometimes you might want to cast your types implicitly, like integers to float to reduce the need of explicit cast operations for the one using your language. Fortunately, there is a library like Typir, that you can use to implement such type systems.
(6/10) if-else blocks
The original code can be found here.
In the Assembly-like world of LLVM, we have no loops or if statements. To imitate them we will use basic blocks and jumps to them. Each basic block has a label to which we can jump during the execution.
In short:
- with
block = llvm.BasicBlock.Create(...)you can create a basic block - with
ir.builder.SetInsertPoint(block)you can insert the beginning of this block (imagine: a label or address is assigned). - with
ir.builder.CreateCondBr(condition, block1, block2);you can jump to one of the blocks depending on the condition that will be evaluated during execution. - with
ir.builder.CreateBr(block);you can jump to the block unconditionally
You must call SetInsertPoint at least once per block to make it jumpable. But the order of jumps and SetInsertPoint calls is not important.
function generateIfStatement(ir: IR, di: DI, { block, condition, elseBlock }: IfStatement) {
    const parentFunc = ir.builder.GetInsertBlock()?.getParent();
    if (parentFunc) {
        //create three blocks: one for the THEN part, one for the ELSE part
        //and a last one for the END part (this is where to jump after THEN or ELSE)
        let thenBB = llvm.BasicBlock.Create(ir.context, 'then', parentFunc!);
        let elseBB = llvm.BasicBlock.Create(ir.context, 'else');
        const mergeBB = llvm.BasicBlock.Create(ir.context, 'ifend');

        //generate code to evaluate the condition
        const conditionValue = generateExpression(ir, di, condition);

        //depending on the value that gets evaluated during execution, jump to the THEN or ELSE block (which are not specified yet :-) )
        ir.builder.CreateCondBr(conditionValue!, thenBB, elseBB);

        //now we will generate the THEN block, so... set the label....
        ir.builder.SetInsertPoint(thenBB);
        //... and generate the code that gets THEN executed...
        generateBlock(ir, di, block.elements);
        //... last but not least: jump to the END block
        ir.builder.CreateBr(mergeBB);
        thenBB = ir.builder.GetInsertBlock()!;

        //do the same for the ELSE block
        parentFunc.insertAfter(parentFunc.getExitBlock(), elseBB);
        ir.builder.SetInsertPoint(elseBB);
        generateBlock(ir, di, elseBlock?.elements ?? []);
        ir.builder.CreateBr(mergeBB);
        elseBB = ir.builder.GetInsertBlock()!;

        //and finally the END block
        parentFunc.insertAfter(parentFunc.getExitBlock(), mergeBB);
        ir.builder.SetInsertPoint(mergeBB);
    }
}
(7+8/10) while and for blocks
The original code for while can be found here.
The original code for for can be found here.
The code for while and for is very similar to if. We can even reuse while for for.
A whileis like an if with an unconditional jump back at the end of the body back to the beginning of the if structure.
Since there are no big surprises, I will not explain the code in detail.
(9/10) Function definitions
Functions on the other hand are a bit more complex. The original code can be found here.
The main steps to generate a function are:
- create a function object
- create an entry block
- fill the block with code (recursively) using our other
generatefunctions - optional: create a return statement when
voidreturn type is given
Here is some annotated code:
export function generateFunction(ir: IR, di: DI, funcDecl: FunctionDeclaration) {
    // Break down the AST node into component parts for the function declaration
    const { name, parameters, returnType, body } = funcDecl;
    const { line } = getPos(funcDecl);
    const signature = parameters.map(p => p.type).concat([returnType]);

    //derive types for return type and parameters
    const funcReturnType = ir.basicTypes.get(returnType.primitive)!;
    const funcParamTypes = parameters.map(p => ir.basicTypes.get(p.type.primitive)!);

    //create the function type and the function object
    const funcType = llvm.FunctionType.get(funcReturnType, funcParamTypes, false);
    const func = llvm.Function.Create(funcType, llvm.Function.LinkageTypes.ExternalLinkage, name, ir.module);

    //create debug information for the function
    const debugInfoParamTypes = di.builder.getOrCreateTypeArray(signature.map(t => di.basicTypes.get(t.primitive)!));
    const debugInfoSubroutineType = di.builder.createSubroutineType(debugInfoParamTypes);
    const debugInfoFuncSubprogram = di.builder.createFunction(
        getCurrScope(di), name, '', di.file, line,
        debugInfoSubroutineType, line, llvm.DINode.DIFlags.FlagPrototyped, llvm.DISubprogram.DISPFlags.SPFlagDefinition
    );
    func.setSubprogram(debugInfoFuncSubprogram);
    ir.builder.SetCurrentDebugLocation(new llvm.DebugLoc());

    //push the new scope on the stack
    di.scope.push(debugInfoFuncSubprogram);

    //create the entry block for the function
    const entryBB = llvm.BasicBlock.Create(ir.context, 'entry', func);
    ir.builder.SetInsertPoint(entryBB);

    //generate the function body
    generateBlock(ir, di, body.elements, { func, inputVars: parameters });

    // if the return type is not void, the return statement was generated in the `generateBlock`
    if (funcDecl.returnType.primitive === 'void') {
        const { line: retLine, character: retCol } = funcDecl.$cstNode?.range.end!;
        ir.builder.SetCurrentDebugLocation(llvm.DILocation.get(ir.context, retLine, retCol, getCurrScope(di)));
        ir.builder.CreateRetVoid();
    }

    //pop the scope from the stack
    di.scope.pop();

    //last polishing
    di.builder.finalizeSubprogram(debugInfoFuncSubprogram);

    //sanity check: is the LLVM IR code correct?
    if (llvm.verifyFunction(func)) {
        console.error(`Verifying the ${name} function failed`);
    }
}
Return statements
The return statement has a special treatment. If the return type is anything else than void, the LLVM IR return statement is generated in the generateBlock function. The original code can be found here.
For a return type of void there is a dedicated builder function builder.CreateRetVoid(); which is generated inside of the generateFunction function. You can find it here.
In the scope of the Ox language, the return statement can be expressed using:
ir.builder.CreateRetVoid();to returnvoid- or
ir.builder.CreateRet(value);to return allvm.Valueobject
Be aware of the AST validation: the LLVM IR generation should only start when the Ox input including the all validations passed successfully. You will normally have enough validations in place to make sure that ideally no invalid LLVM IR will be generated.
(10/10) Function calls
The original code can be found here.
The function call here happens exactly as for printf, but the difference is that we will have no function object until we defined the function.
To define the function we must generate its signature object and register it to be able to reach it using Function class from the LLVM API.
In our grammar, the function is modelled as MemberCall. We have already touched the corresponding function above.
export function generateMemberCall(ir: IR, di: DI, expr: MemberCall): llvm.Value {
    const member = expr.element.ref!;
    ir.builder.SetCurrentDebugLocation(getDILocation(ir, di, expr));

    //if (isParameter(member) || isVariableDeclaration(member)) {...} else
    if (isFunctionDeclaration(member)) {
        //try to get the function object from the module
        const func = ir.module.getFunction(member.name);
        if (func) {
            //create the actual call and return llvm.Value as result
            return ir.builder.CreateCall(func, expr.arguments.map(a => generateExpression(ir, di, a)));
        }
        throw new Error(`LLVM IR generation: Function '${member.name}' is not in scope.`);
    }
}
Execute the generated LLVM IR code
In this last step we run our generator by passing it an Ox file. As a result we will get a LLVM IR file (extension .ll). This file can be compiled with clang into an executable. Since we put debug information into the LLVM IR code, we can also debug the executable with lldb.
-
Generate a
factorial.llfor./examples/factorial.oxin./examples/dbgnode ./bin/cli.js generate ./examples/factorial.ox -d ./examples/dbg -
Compile
factorial.llinto an executable./examples/dbg/outin debug mode usingclang:clang -g ./examples/dbg/factorial.ll -o ./examples/dbg/out -
To run your executable, call:
./examples/dbg/outYou should see the output of
factorial(5):> 120 -
To debug using the LLDB debugger CLI
lldb(you will experience a step-through debugging along the original Ox source code):lldb ./examples/dbg/out (lldb) b 3 # sets the breakpoint on line 3 (lldb) r # runs the program (lldb) print n # prints the value of the variable n (lldb) next # go to the next line 4 (lldb) q # quit the debugger
Conclusion
As you can see, making your programming language executable with Langium and LLVM is challenging but provide a huge flexibility to control the translation in detail. The single steps towards the goal of having a LLVM IR generator are small and help to structure and test the implementation.
As a result of this process you will create a LLVM IR generator that enables your language and its programs to be
- platform-independent: you can create software for any platform that is supported by LLVM
- optimizable during the compile time: the LLVM IR code can be optimized by the LLVM toolchain: reuse various existing optimizers from the LLVM ecosystem, write your own optimizer, change/replace/add more optimizers without changing the frontend and the backend of your compiler
- debuggable during the execution: due to the debug information we put in, we are able to step through the machine instructions but along the original source code
- fast during the execution: since we are compiling to LLVM IR code, which is then compiled to native code, we can get the fastest executions, we can think of - compared to of having a virtual machine in-between - since we can take the optimizations developed by the LLVM community over years.
The adventure is not over yet. There are many more things to explore and implement. Here are some ideas:
- add support for more data types, like
array,struct, … - add support for translating multiple files independently and linking them together
- translate more complex expressions, like member access, array access or complex mechanisms like closures
- implement optimizations on the LLVM IR code
- create your own object-oriented programming model (LLVM does not provide one out of the box, it is literally a “Low-Level virtual machine”)
Now it is your turn. I hope you will have fun creating your own language backend. Enjoy the process.
About the Author
Markus Rudolph
Markus likes to be creative: writing programs, drawing or scripting song texts. He normally has more ideas than time to implement them. But his secret passion is the subject of language engineering.