Generate traced code with Xtext
 Dr. Miro Spönemann
Xtext 2.12 is released on May 26th. As described in its release notes, a main novelty is an API for tracing generated code.
Why tracing?
Whenever you transpile code from one language to another, you need some kind of mapping that instructs the involved tools how to navigate from a piece of source code to the respective target code and back. In a debugging session, for example, developers can get quite frustrated if they have to step through the generated code and then try to understand where the problem is in their original source. Allowing to debug directly in the source code saves time and frustration, so it’s definitely the way to go. For transpiled JVM languages such as Xtend, the JSR 45 specification defines how to map byte code to the source. For languages that target JavaScript, such as TypeScript or CoffeeScript, source maps are generated by the compiler and then processed by the development tools of the web browser. The DSL framework Xtext offers an API to access tracings between source and target code for any language created with Xtext. Xbase languages such as Xtend make use of such tracings automatically, but for other languages the computation of tracing information had to be added manually to the code generator with Xtext 2.11 and earlier versions.
Tracing Xtend templates
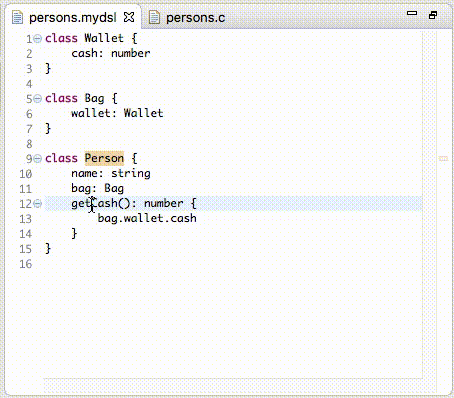
The examples shown in this post are available on GitHub. They are based on a simple Xtext language that describes classes with properties and operations.
class Person {
    name: string
    bag: Bag
    getCash(): number {
        bag.wallet.cash
    }
}
class Bag {
    wallet: Wallet
}
class Wallet {
    cash: number
}
The examples are implemented in Xtend, a language that is perfectly suited to writing code generators. Among other things, it features template expressions with smart whitespace handling and embedded conditionals and loops. Here’s an excerpt of the generator implementation of our example, where the target language is C:
override void doGenerate(Resource resource, IFileSystemAccess2 fsa, IGeneratorContext context) {
    val model = resource.contents.head as Model
    val baseName = resource.baseName
    fsa.generateTracedFile(baseName + '.h', model, '''
        /********************************
         * Header file for «resource.URI.lastSegment»
         */

        #ifndef «baseName.toUpperCase»_H
        #define «baseName.toUpperCase»_H

        «FOR c : model.types»
            «generateHeader(c)»
        «ENDFOR»

        #endif
    ''')
}
The entry point of the new API is TracingSugar, which provides extension methods to generate traced text.
The code above uses generateTracedFile to create a file and map its contents to model, the root of our AST.
The generateHeader method is shown below. It defines another template, and the resulting text is mapped to the given ClassDeclaration using the @Traced active annotation.
@Traced protected def generateHeader(ClassDeclaration it) '''
    /*
     * Declaration of «name» class
     */
    struct _«_name»
    {
        «FOR p : members.filter(Property)»
            /* Property «name».«p.name» */
            «generateDeclaration(p)»
        «ENDFOR»
    };
'''
The _name extension method in the code above is another part of the new API.
Here it writes the name property of the ClassDeclaration into the output and maps it to the respective source location.
This method is generated from the EMF model of the language using the @TracedAccessors annotation.
Just pass the EMF model factory class as parameter to the annotation, and it creates a tracing method for each structural feature (i.e. property or reference) of your language.
@TracedAccessors(MyDslFactory)
class MyDslTraceExtensions {
}
The generator tree
The new tracing API creates output text in two phases: first it creates a tree of generator nodes from the Xtend templates, then it transforms that tree into a character sequence with corresponding tracing information. The base interface of generator nodes is IGeneratorNode. There are predefined nodes for text segments, line breaks, indentation of a subtree, tracing a subtree, and applying templates. The generator tree can be constructed via templates, or directly through methods provided by TracingSugar, or with a mixture of both. The direct creation of subtrees is very useful for generating statements and expressions, where lots of small text segments need to be concatenated. The following excerpt of our example code generator transforms calls to class properties from our source DSL into C code:
val n = trace(expression)
val receiverVar = expression.receiver?.generateExpression(n, scope)
val resultVar = scope.nextVarName
n.append(generateType(expression.feature?.type))
n.append(' ')
n.append(resultVar)
...
n.append(' = ')
n.append(receiverVar ?: 'this')
n.append('->')
n.append(feature.name)
...
n.append(';')
parent.append(n)
parent.appendNewLine
The parts of the TracingSugar API used in this code snippet are
traceto create a subtree traced to a source AST element,appendto add text to the subtree, andappendNewLineto add line breaks.
The resulting C code may look like this:
Bag* __local_0 = this->bag;
Wallet* __local_1 = __local_0->wallet;
double __local_2 = __local_1->cash;
Employing the traces
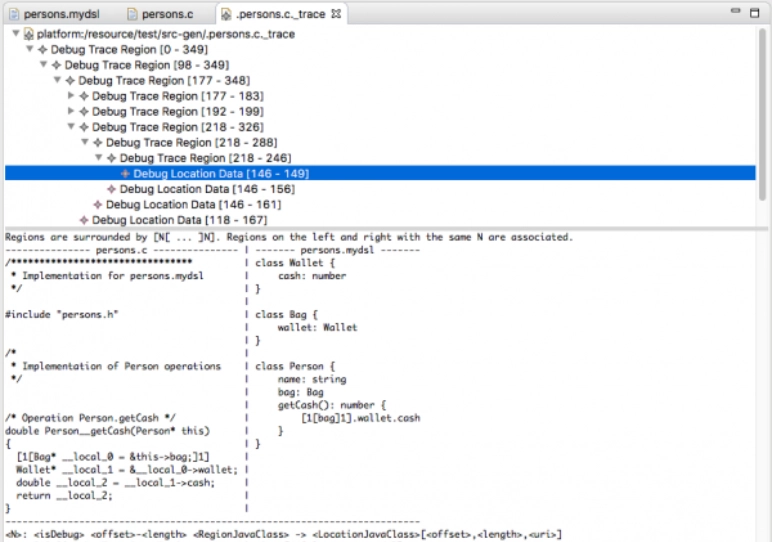
Trace information is written into _trace files next to the generator output.
For example, if you generate a file persons.c, you’ll get a corresponding .persons.c._trace in the same output directory. Xtext ships a viewer for these files, which is very useful to check the result of your tracing computation.
In the screenshot below, we can see that the property reference bag is translated to the C code Bag* __local_0 = &this->bag;
The programmatic representation of such a trace file is the ITrace interface.
An instance of ITrace points either in the source-to-target or the target-to-source direction, depending on how it was obtained.
In order to get such a trace, inject ITraceForURIProvider and call getTraceToTarget (for a source-to-target trace) or getTraceToSource (for a target-to-source trace).
Xtext provides some generic UI for traced generated code: If you right-click some element of your source file and select “Open Generated File”, you’ll be directed to the exact location to which that element has been traced.
In the same way, you can right-click somewhere in the generated code and select “Open Source File” to navigate to the respective source location.
This behavior is shown in the animation below.
Enhancing existing code generators
In many cases it is not necessary to rewrite a code generator from scratch in order to enhance it with tracing information. The new API is designed in a way that it can be weaved into existing Xtend code with comparatively little effort. The following hints might help you for such a task, summarizing what we have learned in the previous sections of this post.
- Use
generateTracedFileto create a traced text file. There are two overloaded variants of that method: one that accepts a template and traces it to a root AST element, and one that accepts a generator node. If you are already using Xtend templates, just pass them to this method. - Add the
@Tracedannotation to methods that transform a whole AST element into text. In some cases it might be useful to extract parts of a template into local methods so this annotation can be applied. - Use the
@TracedAccessorsannotation to generate extension methods for tracing single properties and references. For example, if you have an expression such asproperty.namein your template, you could replace that with<span style="color: #555;">property.</span><span style="color: #ab3000;">_name</span>so that the expression is properly traced. - Use the TracingSugar methods to construct a generator subtree out of fine-grained source elements such as expressions. If you have previously used other string concatenation tools like StringBuilder or StringConcatenation, you can replace them with CompositeGeneratorNode (see e.g.
generateExpressionin our example code).
It’s time to trace!
With the new Xtext version 2.12, generating traced code has become a lot simpler. If such traces are relevant in any way for your languages, don’t hesitate to try the API described here! We also welcome any feedback, so please report problems on GitHub and meet us on Gitter to discuss things, or just to tell us how cool tracing is :-)
About the Author
Dr. Miro Spönemann
Miro joined TypeFox as a software engineer right after the company was established. Five years later he stepped up as a co-leader and is now eager to shape the future direction and strategy. Miro earned a PhD (Dr.-Ing.) at the University of Kiel and is constantly pursuing innovation about engineering tools.