Automatic conversion of containers to virtual machines
 Kai Salmen
A couple of weeks ago I had an idea: There must be a way to automatically and repeatably transform variable container images into fully executable virtual machines. What may seem completely counter-intuitive has some real-world applications, I think. At the end of this post I will share some thoughts on it, but before you consider jumping ahead let me explain the actual proof of concept. Along the way I learned more about containers, related tooling and Linux in general.
Motivation
One of the main goals of application containers is to run a specific process with all its required dependencies isolated from the rest of the operation system until the process reached its final state and exits.
Nowadays, what is executed within containers varies immensely. On the one side there are containers that fulfill a very specific task. They need to start-up quickly, consume few resources and terminate once the process completes. On the other end of the spectrum there are huge containers that run even multiple applications with a huge set of dependencies. For example, they realize a complex build environment to be used inside a CI/CD system or to encapsulate a local development environment. In these cases resource consumption and start-up times are likely not the most crucial factors.
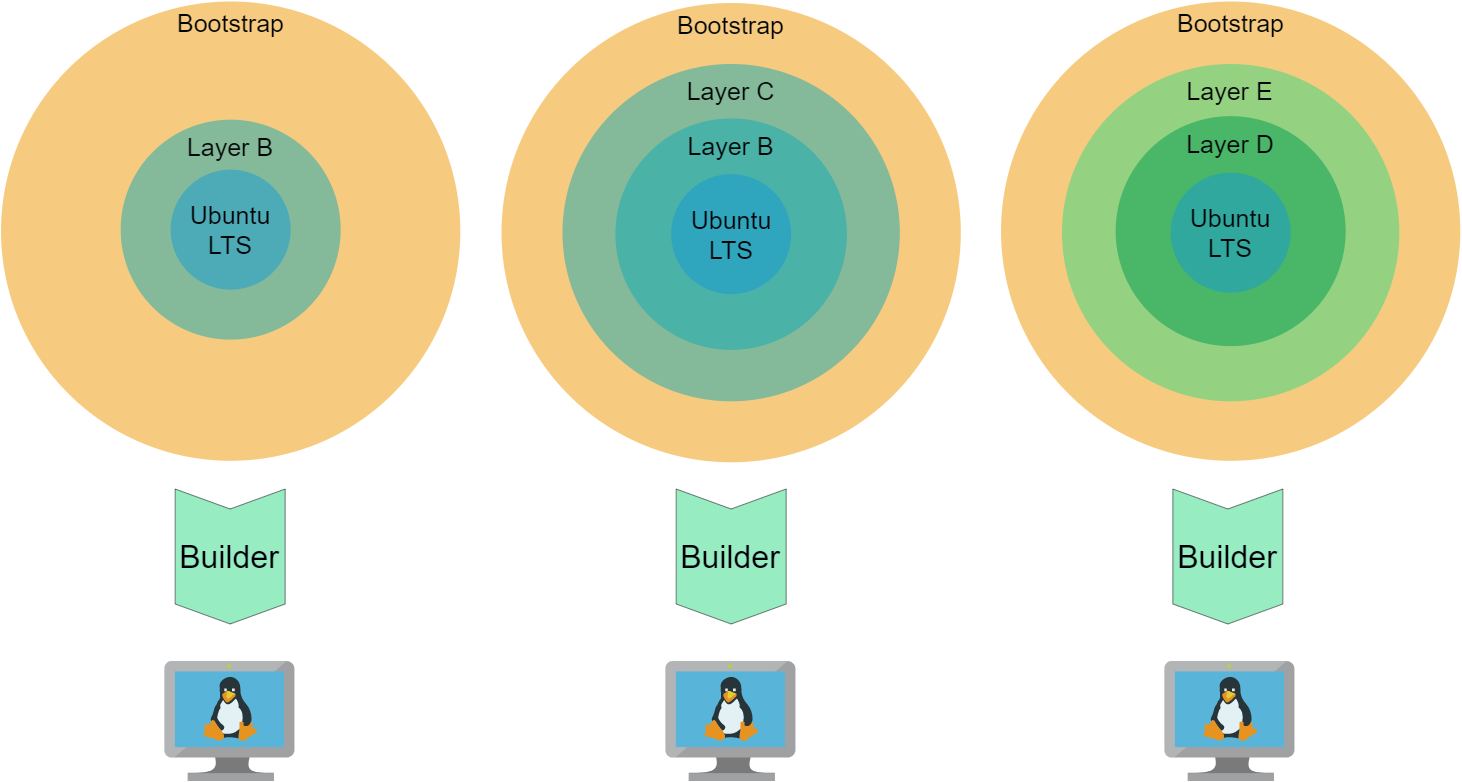
Container images define the content of a container and they also mostly define how and what is run once the image gets instantiated as a container (run). Container images are assembled like onion layers that usually inherit the content of inner layers and add complexity on the outside. This mechanism enables you to build application execution environments that augment each other and gain complexity layer by layer. Images can become so complex that they provide almost everything a complete Linux system requires to run.
So, by defining container images we already have the capabilities and mechanisms available which enables you to define and automate how a complex environment is built.
So, if you can augment layers on the outside of an existing container image there must be a way to augment or prepare full-system initialization capability (called bootstrap later).
I created Windows Subsystem for Linux (WSL) machines from exported docker containers before.
The problem is similar as the Linux Kernel is provided by Windows from the outside and the Linux inside has no kernel and a simple init system.
So, there must exist a combination of external tools (external to container building) that allows you to add a kernel plus init system and create a bootable partition from it. Then it can be run as VM.
The following guide will show you how this is possible and what constraints do currently apply.
Guide: from container to VM
The steps below guide you through the process of transforming two example containers to VMs. Everything is available in the proof of concept repository: https://github.com/kaisalmen/c2vm
Before we go into the details, let me give you a quick overview of the transformation process:
- Take an existing container image
- Augment it with a new container image containing a linux kernel and an init system
- Export the container image content to a tarball
- Create a partition in an file, associate it with a loop back device and create a filesystem
- Mount the filesystem and extract the container tarball to it
- Configure
extlinuxas bootloader and write a master boot record to the image file - Image file can now be used with KVM (VirtualBox or Hyper-V via disk conversion)
Note: The usage of extlinux and creation of filesystem via loop devices was adapted from https://github.com/iximiuz/docker-to-linux.git
Prerequisites
You need to be able to perform privileged operations on a linux machine and you need to have basic knowledge about docker (build, pull & run).
I used both an Ubuntu Linux and WSL2 Ubuntu distribution on Windows to implement it and to verify the overall process works.
docker is used for building and executing the images and it must run on a Linux platform (including WSL2).
The overall transformation process from a container image to a virtual machine could be adapted to other container build tools and runtime environments (e.g. buildah and podman), but for simplicity reasons docker is used.
The transformation process is performed by bash script relying on specific software like docker, extlinux and qemu-utils.
Running the transformation inside a privileged container (called builder later) is the easiest way to make the transformation process available on other platforms because the container image simply defines the required software stack.
You can optionally run it on your bare metal or virtualized Linux platform when you have installed the packages mentioned above.
The example container images and the bootstrap container are are all based on Ubuntu LTS and the actual transformation process (builder) is done inside an Ubuntu based container as well.
Clone the bespoke repository https://github.com/kaisalmen/c2vm to directly execute the described steps or copy paste the described steps.
Existing image
Ok, time for the constraints: You currently cannot take any container image from the internet and transform it. But you can use every image based on UbuntuLTS (20.04 or 18.04). To relax complexity a bit, let’s start with a simple example first to guide you through the transformation process.
The first example image is based on ubuntu:20.04. It upgrades the packages and installs git (see https://github.com/kaisalmen/c2vm/blob/main/examples/basic/Dockerfile):
FROM ubuntu:20.04
RUN apt update && apt upgrade -y
RUN apt install -y git
Either build it yourself:
(cd examples/basic && docker build -t c2vm/examples/basic .)
or pull the existing image:
docker pull docker.pkg.github.com/kaisalmen/c2vm/examples-basic:latest
Optional: Verify it is working as expected (use the first command for locally built containers):
docker run -it c2vm/examples/basic git --version
docker run -it docker.pkg.github.com/kaisalmen/c2vm/examples-basic:latest git --version
It should print: git version 2.25.1.
The builder
The builder executes the transformation script and ensures all required software packages are available.
Like in the previous chapter either pull and directly use the container image from GitHub:
docker pull docker.pkg.github.com/kaisalmen/c2vm/builder:latest
or build it locally:
(cd builder && docker build -t c2vm/builder .)
Optional: Verify it is working as expected (use the first command for locally built containers):
docker run -it c2vm/builder extlinux --version
docker run -it docker.pkg.github.com/kaisalmen/c2vm/builder:latest extlinux --version
It should print: extlinux 6.04 Copyright 1994-2015 H. Peter Anvin et al
Build the VM image
Now, we have everything available to start the transformation.
Detailed explanation of transformation
We need to ensure there is a loopback device available and store which one to be used by buildVM.sh. If no device is available, try losetup -D to detach bound devices and try again.
export LOOPDEV=$(losetup -f)
Now what happens when script buildVM.sh is executed inside the builder container? Before you execute it, let’s have a look at the explanation of the parameters below.
docker run -it \
--env LOOPDEV=${LOOPDEV} \
-v /var/run/docker.sock:/var/run/docker.sock \
-v `pwd`:/workspace:rw \
--privileged \
--device ${LOOPDEV} \
docker.pkg.github.com/kaisalmen/c2vm/builder:latest \
bash buildVM.sh docker.pkg.github.com/kaisalmen/c2vm/examples-basic:latest 2048
It instructs docker to run the image docker.pkg.github.com/kaisalmen/c2vm/examples-basic:latest and execute the buildVM.sh with bash and provide these two parameters to the script:
- 1: The image to be converted and extended with the
bootstrapimage (the example image we previously created):docker.pkg.github.com/kaisalmen/c2vm/examples-basic:latest - 2: Disk size in megabyte (e.g. 2048, but for the larger images, you must create bigger images
Hint: If you built all containers locally, you need to change the container image names.
The other parameters required for:
-v /var/run/docker.sock:/var/run/docker.sock: Make the docker socket available, so the docker inside can use the socket to build containers-v $(pwd):/workspace:rwMount the local directory to the/workspacedirectory inside the container--privileged: Privileged executionenv LOOPDEV=${LOOPDEV}: Make the environment variable available, so inside the container it is known which loop device was selected-device ${LOOPDEV}: Make the device available to the container
This is the output of the script when it creates the VM from the examples-basic container:
Starting with the following configuration:
Base Image: docker.pkg.github.com/kaisalmen/c2vm/examples-basic:latest
Disk Size: 2048
Loop Device partition offset: 1048576

Building bootstrap image:
[+] Building 0.1s (14/14) FINISHED
...

Exporting bootstrap image:

Creating partition in image file:
1024+0 records in
1024+0 records out
2147483648 bytes (2.1 GB, 2.0 GiB) copied, 1.63902 s, 1.3 GB/s
Checking that no-one is using this disk right now ... OK

Disk ./staging/linux.img: 2 GiB, 2147483648 bytes, 4194304 sectors
Units: sectors of 1 * 512 = 512 bytes
Sector size (logical/physical): 512 bytes / 512 bytes
I/O size (minimum/optimal): 512 bytes / 512 bytes

>>> Script header accepted.
>>> Script header accepted.
>>> Script header accepted.
>>> Script header accepted.
>>> Created a new DOS disklabel with disk identifier 0x6332766d.
./staging/linux.img1: Created a new partition 1 of type 'Linux' and of size 2 GiB.
./staging/linux.img2: Done.

New situation:
Disklabel type: dos
Disk identifier: 0x6332766d

Device               Boot Start     End Sectors Size Id Type
./staging/linux.img1 *     2048 4194303 4192256   2G 83 Linux

The partition table has been altered.
Syncing disks.

Creating filesystem in loopback device:
mke2fs 1.45.5 (07-Jan-2020)
Discarding device blocks: done
Creating filesystem with 524032 4k blocks and 131072 inodes
Filesystem UUID: 041b4f32-9715-48ca-b3f7-2f613addab99
Superblock backups stored on blocks:
        32768, 98304, 163840, 229376, 294912

Allocating group tables: done
Writing inode tables: done
Creating journal (8192 blocks): done
Writing superblocks and filesystem accounting information: done


Copying files to mounted loop disk root:

Configuring extlinux:
./staging/mnt/boot/ is device /dev/loop2
Warning: unable to obtain device geometry (defaulting to 64 heads, 32 sectors)
         (on hard disks, this is usually harmless.)

Creating master boot record:
1+0 records in
1+0 records out
440 bytes copied, 6.77e-05 s, 6.5 MB/s
So, let’s look at specific things the script does. After the script checks the validity of the parameters, the bootstrap Dockerfile is build.
It is instructed to augment the referenced image c2vm/examples-basic:latest.
This is done by passing a variable base image as argument to the build command which is consumed by the FROM instruction in the Dockerfile.
Because the bootstrap augments various images it is only needed during the transformation process. It will and can be overridden every time the script is run. Once the image is built, it is exported as tarball to the staging area (sub-directory):
docker build -t c2vm/bootstrap . --build-arg BASE_IMAGE=${DOCKER_BASE_IMAGE}

docker export -o ./staging/bootstrap.tar $(docker run -d c2vm/bootstrap /bin/true)
Now dd is used to write zeros into an image file.
The partition is built from the information dynamically created from the given size parameter (here 2048MB) and is written into ./staging/partition_info.txt.
This file is used to create a DOS partition which size (as sectors) is dynamically calculated from the input size:
dd if=/dev/zero of=./staging/linux.img bs=${PARTITION_SIZE_DD} count=1024
sfdisk ./staging/linux.img < ./staging/partition_info.txt
Next, the loop back device is connected to the image file containing the DOS partition.
An ext4 file system is created on the device, but with an offset of (512 * 2048), because the space is needed for the master boot record that is written last in the process.
Afterwards the loop device is mounted to staging/mnt and the content of the bootstrap tarball is written to it:
losetup -o ${LOOP_OFFSET} ${LOOPDEV} ./staging/linux.img
mkfs.ext4 ${LOOPDEV}
mount -t auto ${LOOPDEV} ./staging/mnt/
tar -xf ./staging/bootstrap.tar -C ./staging/mnt
Once everything is extracted it is time for extlinux to write the boot image and copy syslinux instructions:
extlinux --install ./staging/mnt/boot/
cp ./builder/syslinux.cfg ./staging/mnt/boot/syslinux.cfg
After unmounting the device and detaching the loop back device, the last step of the transformation process is to write the master boot record to the image file:
dd if=/usr/lib/syslinux/mbr/mbr.bin of=./staging/linux.img bs=440 count=1 conv=notrunc
Create a VM
You can directly use virt-manager or use virsh via CLI to create a new VM and use staging/linux.img as disk. You can also use the following command to create a VM with KVM that is started after creation. Use virt-manager to access it easily:
virt-install --import \
--disk ./staging/linux.img,cache=none \
--name=c2vm-kvm \
--vcpus=2 \
--memory=2048 \
--graphics spice \
--noautoconsole
There are scripts readily available for converting the img file to vhdx (Hyper-V) with createVhdx.sh or vdi (VirtualBox) with createVdi.sh.
You can login as root with password root (yes very creative, I know).
Again check the version of git with git --version and it should also print: git version 2.25.1.
Use systemctl status to verify everything is working as expected.
More complex examples
Devbox
Use the image available from github to quickly test this example or build the image locally
docker build -t c2vm/examples/devbox . --build-arg BASE_IMAGE=c2vm/examples/basic
and then adjust the container image names below accordingly:
export LOOPDEV=$(losetup -f); \
docker run -it \
--env LOOPDEV=${LOOPDEV} \
-v /var/run/docker.sock:/var/run/docker.sock \
-v $(pwd):/workspace:rw \
--privileged \
--device ${LOOPDEV} \
docker.pkg.github.com/kaisalmen/c2vm/builder:latest \
bash buildVM.sh docker.pkg.github.com/kaisalmen/c2vm/examples-devbox:latest 4096
This time many development tools are installed (java+maven, node, rust, deno and docker) and user vmuser is created (password is identical to user name).
Devbox with desktop environment
Use the same command from devbox chapter above but with the following image
docker.pkg.github.com/kaisalmen/c2vm/examples-devbox:latest
and with 6144MB for the disk size or use the locally build image
docker build -t c2vm/examples/devboxui . --build-arg BASE_IMAGE=c2vm/examples/devbox 6144
Now you get a full xfce4 desktop environment. Use the vmuser again for logging in. Internet connection should be available if you allowed and connected an external network connection to the VM.
Final thoughts and potential application
There are tools available allowing you to get pre-configured Virtual Machines (e.g. Vagrant).
What makes this approach attractive are its simplicity. Just by using software that is required for creating and running containers and by using tools that are available with Linux you can create a virtual machine.
There is no need for any extra software.
If you already have a complex container stack this approach defines a way to augment any layer of this stack with the capability to transform it to a virtual machine.
When transforming containers to VMs you get a platform that serves a set of very specific purposes.
For me apart from finding out “how it works” this is interesting, because one real world application could be to be able to supply tailored operating systems to individuals or enterprises who do not have access to global cloud infrastructure or a private cloud. Another real world application could be to build VMs from container stacks via an existing continuous integration pipeline just as an optional step. The output of this optional step is a fully usable virtual machine in addition.
With the outlined approach you gain the capability to define the complete operating system and its configuration just with means (configuration files and scripts) available from container image build tools. This allows advanced configuration during container image build and preparation of any post actions once the VM is booted.
Next steps
The first step will be to broaden the scope from Ubuntu to other Linux distributions. Therefore the augmentation boostrap must be created for different Linux flavours. Using a DOS partition and extlinux works fine, but it would make sense to support GPT and other boot loaders.
I hope you enjoyed what you just read and it sparked new ideas inside your head.
Kai
About the Author
Kai Salmen
Adapting new technologies, solving problems, and making things work well together with the team of people defines best what Kai’s work has always been about. From 3D computer graphics to space ground control systems and now language engineering tools he acquired a diverse skill set over the last twenty years. Working fully remote lets Kai combine family and work in the most positive way.